✏️ Easy Made Pencil Treat Bags

If you’re looking for an easy and adorable way to brighten someone’s first day back at school, these Pencil Treat Bags are just the thing. Shaped like cheerful yellow pencils and filled with sweet surprises, they’re perfect for teachers, students, and classroom parties. Whether you’re welcoming a new teacher, treating your child’s classmates, or just spreading a little school-year cheer, these crafty little bags deliver smiles with every bite.
Not only are they simple to assemble, but they’re also budget-friendly and customizable. Plus, they double as both a cute gift and a practical goodie bag.
💛 Why You’ll Love These DIY Pencil Treat Bags
- They’re easy to make with just a few supplies.
- Kids and teachers absolutely love them.
- Perfect for back-to-school gifts, teacher appreciation, or class parties.
- You can personalize each one with names, messages, or different treats.
📝 Supplies and Instructions
Yields: 10 pencil treat bags
Prep Time: 30 minutes
Estimated Total Cost: Low (great for bulk gifting!)
Supplies Needed:
- Yellow cardstock or construction paper
- Pink cardstock (eraser top)
- Silver or gray paper (metal band)
- Triangle-shaped candies or snacks (like Rolo, Hershey’s Kisses, or pretzel rods)
- Clear treat bags
- Ribbon or twist ties
- Glue stick or tape
- Black marker for the pencil tip
✂️ How to Assemble the Pencil Treat Bags
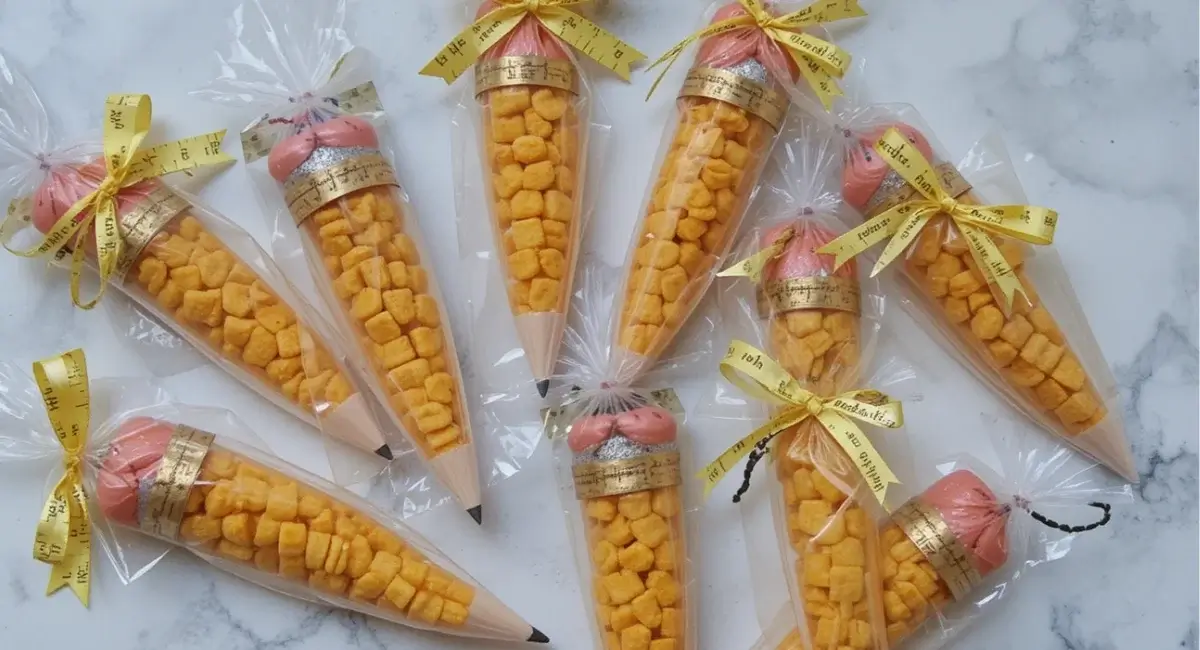
Cut yellow cardstock into rectangles to wrap around your clear treat bags. Glue or tape it in place. Cut small strips of silver or gray paper and wrap around the top edge of the yellow to mimic the pencil’s metal band. Then add a pink rectangle above the gray strip for the eraser.
Use a black marker to color the bottom of the yellow portion into a point to represent the pencil tip. You can also attach a small triangle of black paper to make it more realistic.
Fill the treat bag with candy or snacks and secure the top with a ribbon or twist tie. You can also write names or fun notes directly on the yellow part for a personalized touch!
🎨 Tips and Variations
- Use stickers or printed labels with encouraging messages like “You’re Sharp!”
- Try different types of candy to match the shape of the pencil tip.
- Let kids decorate their own for a fun classroom activity.
- Add mini pencils or erasers inside for a mixed surprise.
Ingredients
Method
- Fill each yellow paper bag about 2/3 full with candy of your choice.
- Trim the top of each bag into a point to mimic a sharpened pencil tip.
- Tape or glue a Hershey’s Kiss (point facing up) onto the pointed end for the pencil tip.
- Wrap the bottom edge of the bag with a strip of silver paper or foil to resemble the metal band of an eraser.
- Flatten a pink mini cupcake liner and glue or tape it over the bottom of the bag to create the eraser.
- Fold over and secure the top flap of the bag if needed, and your pencil treat bags are ready!
Notes
❓ Frequently Asked Questions
Yes! You can prepare them up to a week ahead. Just store them in a cool, dry place to keep the treats fresh.
Small wrapped candies like M&M’s, Kisses, Rolos, jelly beans, or even pretzel sticks work well. Avoid anything that melts easily.
Not necessarily. You can eyeball the measurements or find free printable templates online if you want a more uniform look.
Absolutely! You can make a non-candy version with real pencils, erasers, and stickers inside instead.
If you’re making them for a classroom, be sure to check with the teacher first for any allergy restrictions. You can opt for non-edible fillers like crayons or mini toys instead.
✨ Make Back-to-School Feel Extra Special
These Pencil Treat Bags are more than just a cute craft—they’re a small gesture that makes a big impact. Whether you’re sending your little one off with confidence or showing appreciation to teachers and classmates, these DIY treats help set the tone for a fun, positive school year. Easy to make, fun to give, and even more fun to receive!