Cherry pie is the ultimate celebration of summer fruit—vibrant, juicy, and tucked into a buttery, golden crust. This homemade version uses fresh or frozen cherries and just the right amount of sweetness to let the fruit shine. Whether you’re baking for a holiday, a picnic, or just because, this cherry pie brings comfort and flavor in every slice.
A Brief History
Cherry pie has deep roots in American cuisine, with European origins that trace back to the 1500s. As cherries became more widely cultivated in the U.S., especially in Michigan and the Pacific Northwest, this fruit pie grew into a classic dessert served during the Fourth of July and summer gatherings. Its enduring popularity comes from the perfect balance of tart fruit and sweet, flaky pastry.
Why You’ll Love It
- Classic and Timeless: A nostalgic dessert loved by all ages.
- Fresh Flavor: Uses real cherries for unbeatable taste.
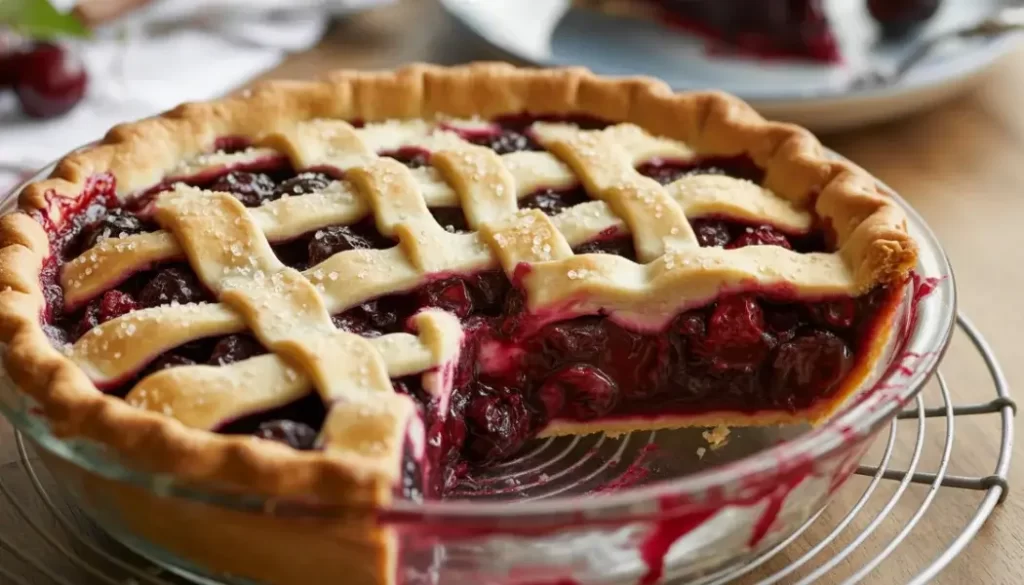
- Beautiful Presentation: Lattice crust adds charm to your table.
- Make-Ahead Friendly: Bake ahead and serve at room temperature.
Recipe (Serves 8)
Ingredients:
- 2 1/2 lbs fresh or frozen cherries (pitted, about 5 cups)
- 3/4 cup granulated sugar
- 1/4 cup cornstarch
- 1 tablespoon lemon juice
- 1/2 teaspoon almond extract
- 1/4 teaspoon salt
- 2 tablespoons butter (cut into small pieces)
- 1 double pie crust (homemade or store-bought)
- 1 egg (for egg wash)
- 1 tablespoon coarse sugar (optional, for topping)
Instructions:
- Preheat oven to 400°F (200°C).
- In a large bowl, combine pitted cherries, sugar, cornstarch, lemon juice, almond extract, and salt. Stir and let sit for 10 minutes.
- Roll out one pie crust and fit it into a 9-inch pie dish.
- Pour the cherry filling into the crust and dot with butter.
- Roll out the second crust and cut into strips to form a lattice top, or lay it on whole and cut slits to vent.
- Seal and crimp the edges, then brush with beaten egg and sprinkle with coarse sugar.
- Bake for 20 minutes at 400°F, then reduce to 350°F and bake for another 35–40 minutes, until the crust is golden and filling bubbly.
- Let cool at least 3 hours before slicing.
Tips & Variations
- Use a cherry pitter to save time when working with fresh cherries.
- Thicken properly by letting the filling bubble and cool for a sliceable pie.
- Add cinnamon or nutmeg for a warm spice note.
- Make it gluten-free by using a gluten-free crust and cornstarch alternative.

🍒 Best Homemade Cherry Pie Recipe
Ingredients
Method
- Combine flour and salt.
- Cut in cold butter with a pastry cutter or fork until it resembles coarse crumbs.
- Add ice water 1 tbsp at a time until dough holds together.
- Divide into 2 discs, wrap in plastic, and chill for at least 1 hour.
- In a saucepan over medium heat, combine cherries, sugar, lemon juice, and cornstarch.
- Cook until thick and bubbly (8–10 min), stirring constantly.
- Remove from heat, stir in vanilla and almond extract, and let cool slightly.
- Roll out one dough disc and place into a 9-inch pie pan.
- Pour in cherry filling and dot with butter.
- Roll out second dough disc and place over filling (full crust or lattice style).
- Crimp edges and cut vents if using a full top crust.
- Brush with egg wash (egg + milk) and sprinkle with sugar.
- Preheat oven to 400°F (200°C).
- Bake for 45–55 minutes or until crust is golden and filling is bubbling.
- Cover edges with foil if they brown too quickly.
- Let pie cool completely (2–3 hours) for the filling to set.
Notes
Use tart cherries if possible — they balance the sweetness perfectly. Frozen cherries work well; no need to thaw, just cook longer. Almond extract adds depth and complements cherries beautifully. Chill your dough for a flaky crust. Protect the crust edges with foil or a pie shield to avoid burning.
- Indulge in our Coconut Dome with Chocolate, a rich and decadent treat that pairs coconut and chocolate in a delightful combination.
- For another fruit-forward dessert, try our Strawberry Rhubarb Crisp, which balances sweet and tart flavors in a comforting baked dish.
- If you enjoyed our Cherry Pie, you might also like the Easy Black Forest Wreath, a festive dessert that layers chocolate cake with cherries and whipped cream.
Frequently Asked Questions
Yes! Sour cherries work beautifully—just increase the sugar to 1 cup or more to balance the tartness.
Yes. Thaw and drain them first to avoid a watery filling.
Bake the pie on the lowest oven rack and consider brushing the bottom crust with egg white before filling.
It stays fresh covered at room temperature for 1 day or refrigerated for up to 4 days.
Absolutely! Wrap it tightly and freeze baked or unbaked for up to 3 months.
Final Thoughts
The Best Homemade Cherry Pie brings together rich tradition, peak-season fruit, and just enough sweetness for a truly satisfying dessert. With a flaky crust and ruby-red filling, it’s a pie that always makes an impression. Bake one for your next gathering—or for yourself—and taste the homemade difference.